![mirro_logo_pnk_slogan.png]](https://help.mirro.io/hs-fs/hubfs/mirro_logo_pnk_slogan.png?height=40&name=mirro_logo_pnk_slogan.png)
The Workflows module in Mirro solves this. You define a process once, assign the right tasks to the right people, set your deadlines, and Mirro coordinates everything — tracking progress, sending reminders, and giving managers and administrators a real-time view of where every process stands, for every person in the organisation.
Key concepts — understanding how Workflows are structured
Before you start building, it helps to understand how the three levels of the module relate to each other. Think of it like a filing cabinet:
- The cabinet is the module itself — Workflows in Mirro
- Each drawer is a Journey — a named category that groups related workflows together (for example, Onboarding, Offboarding, or Performance Development)
- Each folder inside a drawer is a Workflow — a specific process with its own tasks, deadlines, and rules (for example, IT Setup, HR Checklist, or 90-day Review)
- Each document inside a folder is a Task — a single action that needs to be completed by a specific person before a specific date
This structure means you can have many related processes living under the same umbrella, making it easy for everyone — employees, managers, and administrators — to see where they are in the bigger picture.
Who can do what — roles in Workflows
Workflow Admin — can create, view, and edit any workflow in the organisation, regardless of who created it. This is the broadest access level and is typically assigned to central HR or platform administrators.
Workflow Manager — can create, view, and edit only the workflows they have created themselves. Suitable for team leads or department heads who manage their own processes independently.
Workflow Manager per Location — can create, view, and edit workflows only for employees at the location they have been assigned. Suitable for HR business partners or local managers responsible for a specific office or site.
Example: A local HR partner in Warsaw has been granted the Workflow Manager per Location right for the Poland office. When they create a workflow and set the audience, they can only include colleagues based in Warsaw — they cannot see or affect workflows in other locations.
Managers (Performance Manager, Head of Department, Department Performance Administrator) can manually trigger workflows for the people they coordinate, update task statuses on behalf of their team, and monitor the progress of every active run for their direct reports.
Task Assignees are any users assigned to one or more tasks within a workflow. They see and manage only the tasks assigned to them — not the full workflow — and can update statuses, add comments, tick checklist items, set reminders, and view attached files.
Where to find Workflows
The Workflows module has two separate sections:
Journeys — where Workflow Admins and Workflow Managers create and configure Journeys and the Workflows inside them.
Tasks — where everyone manages their work. The Tasks section is organised into tabs based on your role:
|
Who you are |
Tabs available |
|
All users |
My Journeys · Other Tasks |
|
Managers |
My Team · My Journeys · Other Tasks |
|
Workflow Admin |
Journeys (company overview) · My Team · My Journeys · Other Tasks |
Part 1 — Setting up a workflow
Step 1 — Create a Journey
A Journey is the category that holds your workflow. Before creating a workflow, you need a Journey to place it in.
- Go to Journeys in the main navigation.
- Click Add Journey and give it a name — for example, Onboarding, Offboarding, or Performance Development.
- Once the Journey is created, click the view details option on the Journey to add workflows inside it.
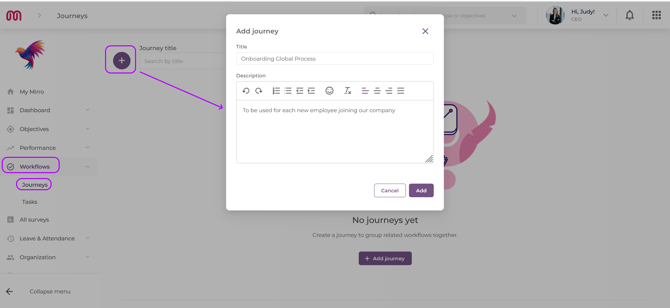
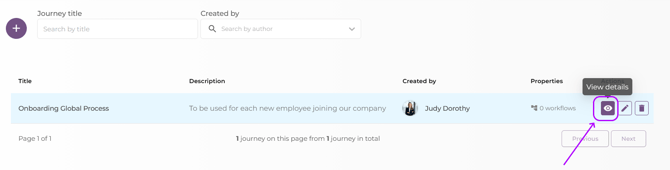
If you need you can edit the name and the description of a journey by accessing the edit option or you can delete a journey entirely.
!!! If you delete a journey you will delete the workflows associated with the journey, too.
Step 2 — Create a workflow inside a Journey
- Inside the Journey, click Add Workflow.
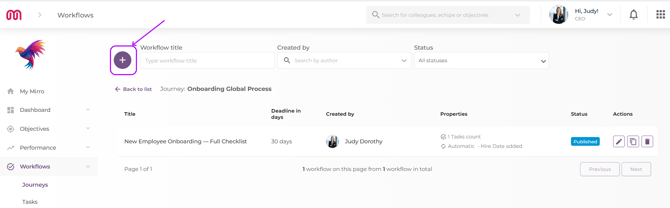
An workflow has 3 distinct tabs that you need to define:
The details tab:
- Fill in the workflow details:
- Workflow title (mandatory)
- Workflow description (optional — but useful for your team to understand the purpose of this workflow at a glance)
Step 3 — Choose how the workflow is triggered
Every workflow needs a triggering rule — this is how Mirro knows when to start it.
Manual triggering — you start the workflow yourself, whenever you need it. Ideal for processes without a fixed calendar date, such as a performance improvement plan or a role transition.
- Set the Workflow deadline — the number of days from the moment you start the workflow until everything should be completed. For example, 30 days from the day you trigger it.
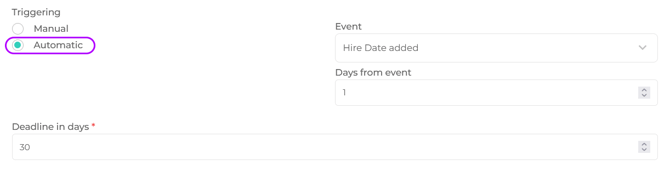
Automatic triggering — Mirro starts the workflow based on a date already in the system, such as a hire date.
- Set the Triggering event — for example, the employee's hire date.
- Set the Trigger offset — how many days after the event the workflow should start. 0 means immediately; 1 means the following day.
- Set the Workflow deadline offset — how many days after the start until everything must be completed (default: 30 days).
💡 Tip: Use automatic triggering for processes tied to a known, consistent date — like an onboarding workflow starting on hire date. Use manual triggering for processes that start at your discretion — like a probation review or a role change checklist.
Step 4 — Choose if the workflow should accept further tasks added
When you build a workflow, you define the core set of tasks that should happen every time that workflow runs — the non-negotiable steps that apply to everyone. But sometimes, the person running the workflow on the ground knows things you couldn't anticipate when you built it. A manager might need to add a specific step for a particular employee, or track something that isn't covered by the standard checklist.
When creating or editing a workflow, you can now choose whether managers are allowed to add their own tasks during an active run. This setting is configured at the workflow level — meaning it applies to every run of that workflow, not just individual instances.
If the option is defined as:
- Enabled — managers can add new tasks to an active run of this workflow, on top of the predefined ones. The tasks they add are specific to that run and do not affect the workflow template.
- Disabled — the workflow runs exactly as defined. No additional tasks can be added once a run is active. This is the right choice when consistency and compliance are the priority — for example, a mandatory compliance checklist where every step must be identical for every employee.

How it works in practice
When a manager adds a task during an active run:
- The new task appears only in that specific run — it does not modify the original workflow template
- The task follows the same structure as any other task: title, description, assignee, deadline, and optional checklists
- The task counts toward the overall completion percentage of the run
- The activity log records who added the task and when, maintaining a full audit trail
💡 Tip: Enable this setting for flexible processes like onboarding or development plans, where managers know their team members individually and may need to tailor the process. Keep it disabled for compliance-driven workflows — like mandatory training checklists or document collection — where every step must be identical and auditable across all employees.
Step 5 — Set up Workflow Assignees Groups
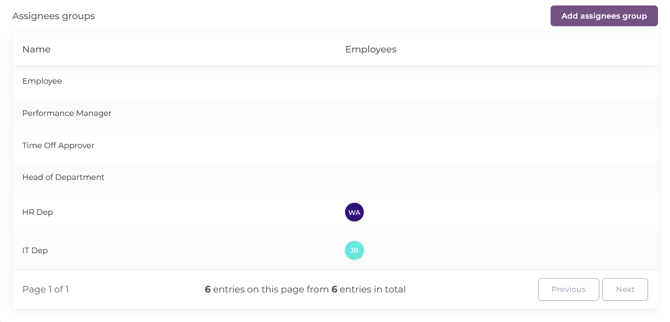
Assignees Groups define which categories of people are involved in a workflow. Default groups are: Employee, Performance Manager, Head of Department, and Time Off Approver. You can create custom groups for any other function involved in your process — for example, IT, Finance, or a local HR team.
To create a new assignee group you need to access the option Add assignees group and you will be able to define the group as you need and search by the name of the colleagues that should be assigned to the specific group.
The tasks tab:
Step 6 — Add tasks
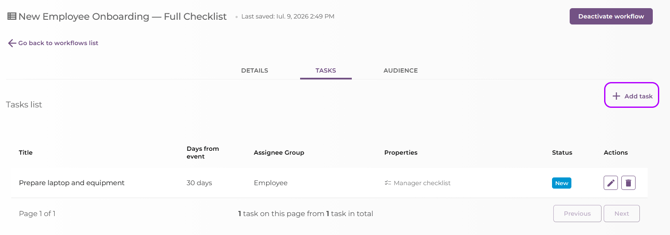
Tasks are the individual actions that make up a workflow. For each task you can define:
- Task title (mandatory) — be specific. "Prepare laptop and equipment" is better than "IT task".
- Task description (optional) — give the assignee context about exactly what they need to do, including links to external systems if needed.
- Employee Checklist (optional) — a list of sub-items the employee tracks themselves. Useful for self-preparation steps.
- Manager Checklist (optional) — a list of sub-items only the manager can tick. Useful for validation and sign-off steps.
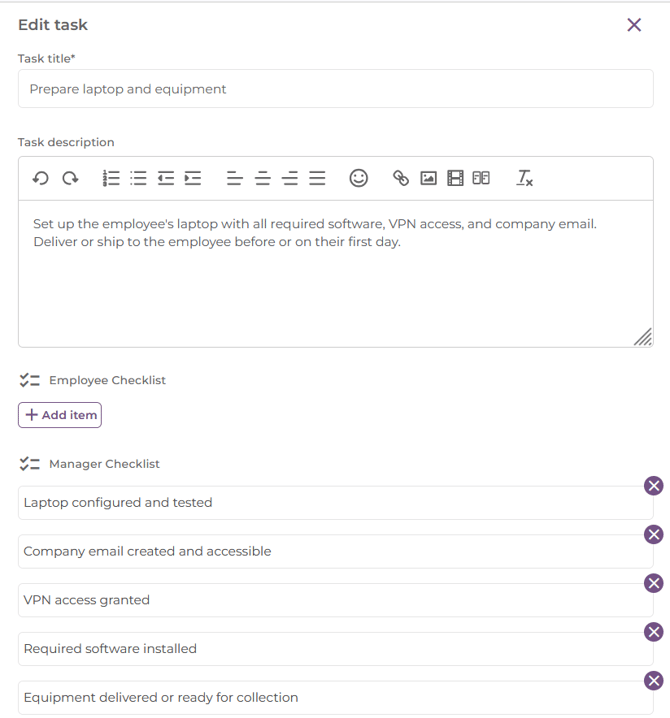
For a task such as Prepare laptop and equipment you can have a manager's checklist defined with subtasks specific to the colleague responsible for this task.
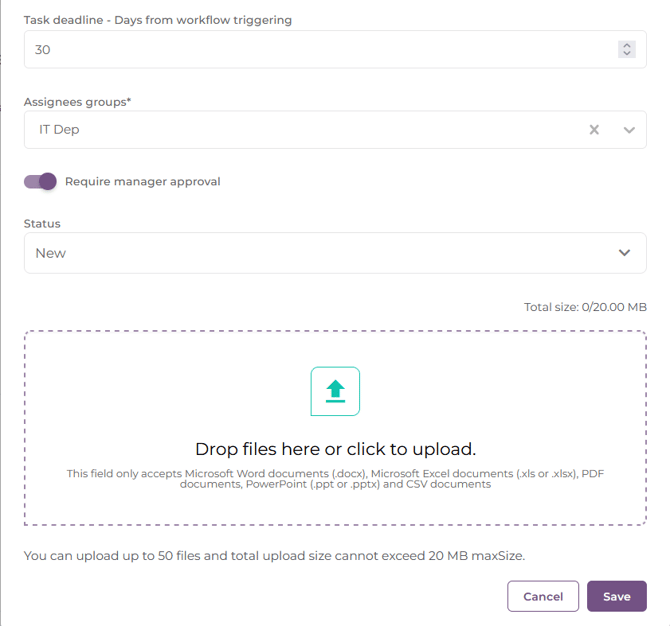
- Task deadline — either the same as the overall workflow deadline, or a specific number of days from when the workflow starts (for example, +2 days for urgent early tasks).
- Assignees groups— the people responsible for completing this task.
For example the IT assignees group defined previously.
- Requires manager approval — when enabled, only the manager can move the task to a completed status. The employee can still comment and tick their own checklist, but cannot self-certify completion.
- Status of the task - some tasks can be defined with a in progress status, if needed
Task statuses:
|
Status |
What it means |
|
New |
Created and waiting to be started |
|
In Progress |
Actively being worked on |
|
On Hold |
Paused temporarily |
|
Done |
Completed |
|
Not Applicable |
Will not be completed — acknowledged with a reason |
- Files — attach documents, templates, or reference materials the assignee will need.
Once all task's details were defined make sure you save it.
In the tasks tab you can edit the tasks already created or to delete them.
The audience tab:
Step 6 — Set the audience
The audience defines which employees this workflow can be triggered for. Use the selector to target specific individuals, teams, departments, locations, job roles, or any combination.
You can add a condition or a condition group to configure the audience:
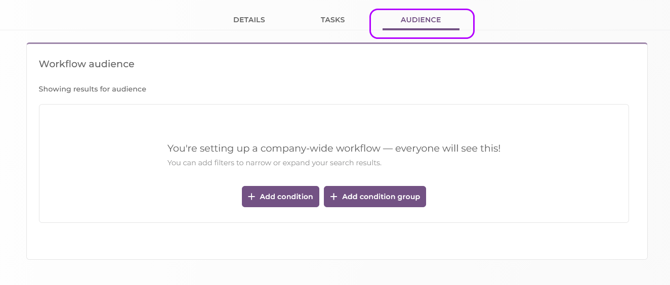
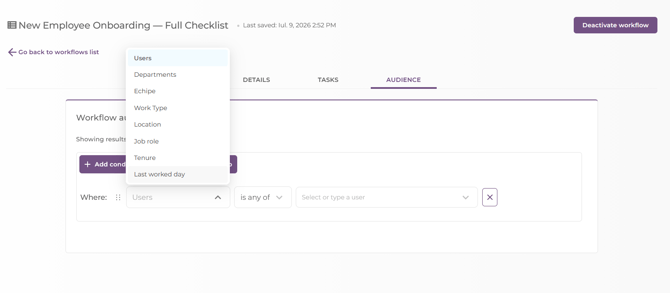
If you add a condition, the session can be addressed to specific:
- users, departments, teams, work types (Employee, Contractor), locations, job roles, or based on tenure or hire date and many more criteria.
Or, if you want a more configurable audience, you can add a condition group, which allows you to target, for example, only certain users from specific departments.
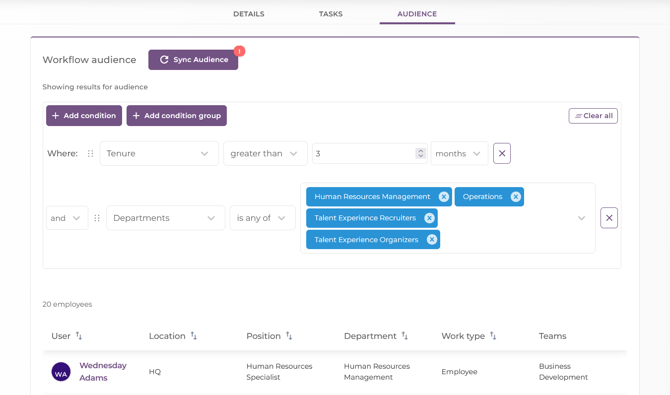
Once you defined the conditions you will at the bottom of the page a list with all the users which are meeting the conditions.
Step 7 — Publish
Once all three sections are complete (Details, Tasks, Audience), publish the workflow. It is now ready to be triggered manually or will start automatically when the conditions are met.
Workflow statuses:
- Draft — created but not yet active. Cannot be triggered.
- Published — active and ready to trigger.
Part 2 — Triggering a workflow
Triggering manually
- Access the profile of a colleague for whom you want to start the workflow. You can search for them by name in the search bar at the top of the app.
- Click Start Workflow.
- Select the workflow you want to trigger.
- Click Start to launch it.
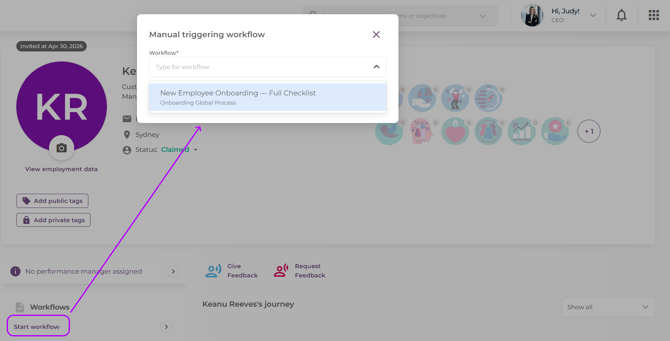
Alternatively, if you are a manager, you can trigger a workflow directly from the My Team tab in the Tasks section, as long as other workflows are already triggered for the employee— click on a colleague's card, and use the Start Workflow button in the header of their view, without leaving the Tasks section.
Triggering automatically
No action needed. Mirro runs a daily check across all published workflows with automatic triggers. When the conditions are met (for example, a hire date is reached), the workflow starts and tasks are assigned automatically.
Part 3 — Monitoring progress
For Workflow Admins — the Journeys overview
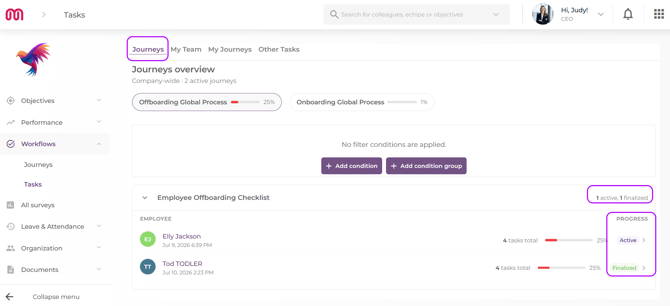
The Journeys tab in Tasks gives Workflow Admins a company-wide dashboard. Each Journey appears as a card showing its aggregated completion percentage across the whole organisation. Clicking into a Journey shows each workflow inside it, and clicking into a workflow shows each employee with an active run — complete with a progress bar colour-coded by level of completion (red for low, yellow for medium, green for high). From here, admins can drill down to any individual employee's task view.
The workflow list now also shows a status tag on each run row — Active or Finalised — so you can see at a glance which runs are still in progress and which have been formally closed. The filter area includes workflow status as a filter option. By default, both Active and Finalised runs are shown. You can filter to show only Active runs (to focus on what still needs attention) or only Finalised runs (to review completed processes).
The workflow header has also been updated: instead of showing a total task count, it now shows X workflows active, Y Finalised — giving you an immediate summary of the state of each workflow across the organisation.
For Managers — My Team
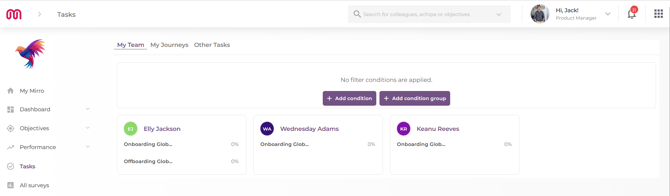
The My Team tab shows one card per direct report, displaying their active Journey and completion percentage. Clicking on a card opens the employee's full task view, where the manager can see all tasks, edit details, add tasks, and trigger new workflows — all without navigating to the employee's profile separately.
For everyone — My Journeys
The My Journeys tab shows your own tasks, organised as a full-width Kanban board. Each workflow appears as an expandable swimlane with five columns: New, In Progress, On Hold, Done, and Not Applicable. The progress bar on each swimlane shows completion in real time.
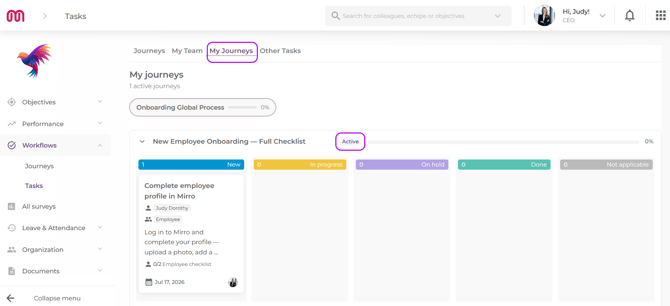
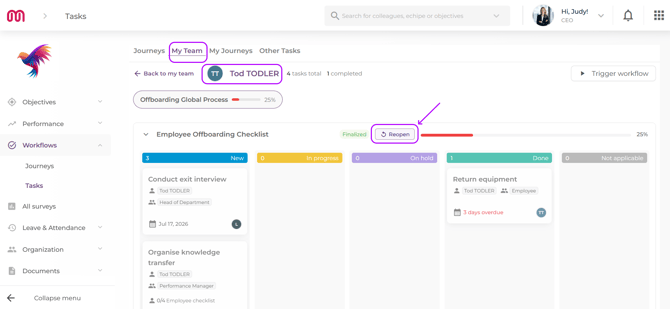
The status of each workflow run is now visible directly on the swimlane header — Active or Finalised. As a manager viewing a colleague's journeys, you can Finalise or Reopen any run directly from this view using the action available on the swimlane. By default, both Active and Finalised runs are visible, so you always have the full picture of someone's journey history, not just what is currently in progress.
How completion is calculated: The percentage of tasks in Done or Not Applicable status, divided by the total number of tasks, multiplied by 100. A task marked Not Applicable counts toward completion — it signals a deliberate decision, not an omission.
Managing multi-stage journeys with Finalise and Reopen
A workflow run can be in one of three states:
Active — the workflow is running. Assignees can update tasks, change statuses, add comments, and set reminders. This is the default state when a workflow is triggered, either manually or automatically.
Finalised — the run has been formally closed by a manager or Workflow Admin. Once finalised, tasks cannot be added, edited, or updated — the run is locked exactly as it was at the moment of finalisation. This gives managers and administrators a reliable, tamper-proof record of how the process concluded.
Active (Reopened) — a previously finalised run that has been reactivated. When a run is reopened, it picks up exactly where it was at the moment it was finalised — task statuses, comments, and progress are all preserved. Nothing resets.
Who can Finalise or Reopen a run:
Managers (Performance Manager, Head of Department, Department Performance Administrator), Workflow Admins, and Workflow Managers applicable to the workflow's audience can both finalise and reopen runs. The employee cannot finalise or reopen a run themselves.
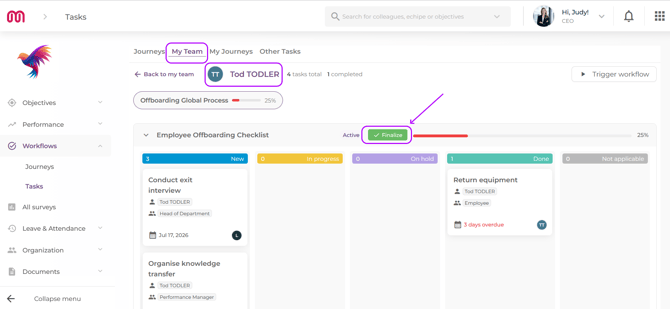
How to Finalise a run:
Open the workflow run from the employee's Journey view. Use the Finalise action available in the run header. The run status will update immediately and tasks will be locked.
How to Reopen a run:
Open a finalised workflow run. Use the Reopen action available in the run header. The run moves back to Active status and tasks become editable again, resuming from their last known state.
💡 Tip: Finalising a run is not the same as completing it. A run can be finalised even if some tasks are still in progress — for example, if a process needs to be formally closed after a decision has been made, regardless of individual task completion. Use finalisation deliberately and communicate to your team when and why a run has been closed.
Part 4 — Working with tasks
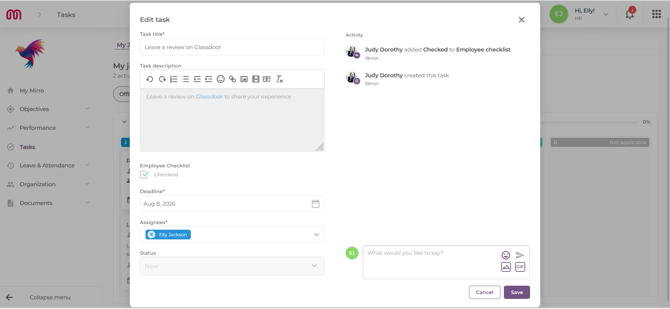
As a task assignee, you find your tasks in Tasks > My Journeys. From each task you can:
- Update the status — where you have permission to do so
- Tick items on your Employee Checklist — track your own sub-steps
- View the Manager Checklist — read-only, managed by your manager
- Add comments — visible to all assignees on the task
- Set a reminder — for yourself or all assignees
- View attached files — documents and materials attached by the Workflow Manager
Every action is recorded in the task's activity log — a permanent, timestamped record of everything that happened.
Use cases — how different teams use Workflows in Mirro
This is where Workflows go from being a module to being a fundamental part of how your organisation operates. Below are ten concrete use cases across different roles and industries, showing the range of what is possible.
1. Employee Onboarding
Journey: Onboarding
Who uses it: HR, IT, Facilities, Line Manager, new employee
Trigger: Automatic — fires 1 day after hire date
A new employee joins and Mirro automatically starts the onboarding workflow the next day. IT receives a task to set up equipment (deadline: +2 days). Facilities receives a task to prepare the desk and access card (deadline: +2 days). HR receives a task to complete the employment paperwork (deadline: +5 days). The line manager receives a task to schedule the first 1:1 and share the 30-day plan (deadline: +7 days). The employee receives a task to complete their profile in Mirro and read the employee handbook (deadline: +14 days).
The manager monitors overall progress from the My Team tab. HR sees the full picture from the Journeys overview. Nothing falls through the cracks because the system is tracking everything.
2. Employee Offboarding
Journey: Offboarding
Who uses it: HR, IT, Payroll, Line Manager, departing employee
Trigger: Automatic — fires 14 days before last worked day
When an employee's last worked date is set in the system, Mirro triggers the offboarding checklist automatically. IT receives a task to revoke system access on the last day. Payroll Dep receives a task to process the final payroll. HR receives a task to conduct the exit interview. The line manager receives a task to organise knowledge transfer. The employee receives a task to return equipment and hand over outstanding work.
Each task has its own deadline relative to the last worked date, ensuring the right things happen in the right order — without anyone needing to remember to start the process.
3. Probation Period — Skills Compliance Validation
Journey: Probation
Who uses it: Line Manager, Employee, HR
Trigger: Automatic — fires 1 day after hire date, deadline 90 days
For frontline, operational, and retail roles, the probation period is less about a reflective conversation and more about validating that the employee has demonstrated the specific skills and standards required to do the job. Workflows handles this through a structured pass/fail checklist — each task represents a skill or compliance requirement, and only the manager can mark it as validated.
The employee uses their checklist to signal readiness — "I have practised this and I am ready to be assessed." The manager observes directly and uses their checklist to validate each specific element of the skill. The task only moves to Done when the manager confirms it — not when the employee says they are ready.
4. Role Change or Internal Transfer
Journey: Role Transitions
Who uses it: HR, IT, new line manager, previous line manager, employee
Trigger: Manual — triggered when the transfer is confirmed
When an employee moves to a new role or team, a role transition workflow captures all the steps that need to happen on both sides. The previous manager completes a handover checklist. IT updates system access and equipment. HR updates employment records and organises the contract amendment. The new manager schedules an onboarding conversation and shares the team handbook. The employee completes a transition check-in form.
Without Workflows, role changes often lead to gaps — the old manager considers their part done, but the new manager hasn't yet picked up the thread.
5. Annual Performance Development Plan (PDP)
Journey: Performance Development
Who uses it: Employee, Performance Manager
Trigger: Manual — triggered at the start of the annual cycle
The manager triggers a PDP workflow for each team member at the start of the cycle. The employee completes a self-assessment task and identifies three development goals. The manager reviews the self-assessment and adds their own observations using the Manager Checklist. Together they complete a goals-setting task. A follow-up workflow is triggered at the 6-month mark to review progress. The Requires Manager Approval setting on each task ensures nothing is marked as complete without the manager's explicit sign-off.
6. Document Collection for Compliance
Journey: Compliance
Who uses it: HR, employee
Trigger: Automatic — fires on hire date or a regulatory deadline
For roles requiring specific documentation — identity verification, certifications, right-to-work checks — a compliance workflow ensures every document is collected and confirmed before the required date. Each document type is a separate task, assigned to the employee to upload and to HR to verify. The Employee Checklist on each task lets the employee track which documents they have prepared, while the Manager Checklist confirms that HR has reviewed and approved each one. A Not Applicable status handles documents that are not required for a specific role or location.
7. New Manager Onboarding
Journey: Manager Onboarding
Who uses it: New manager, HR, their own manager, IT
Trigger: Manual — triggered when the manager promotion is confirmed
When someone is promoted into a management role for the first time, they need a different kind of onboarding than a new hire. A manager onboarding workflow covers: access to manager-level tools and reports, a briefing on performance management processes, an introduction to their team's current objectives and check-in sessions, and a meeting with their own manager to align on expectations. HR attaches training materials and policy documents directly to the relevant tasks.
8. IT Offboarding Checklist for Departing Contractors
Journey: Contractor Offboarding
Who uses it: IT, Finance, Procurement
Trigger: Manual — triggered when a contractor engagement ends
Contractor offboarding is different from employee offboarding — there are no employment records to update, but there are vendor systems, access permissions, and invoicing steps that need to happen. A dedicated contractor offboarding workflow handles: revoking access to all internal systems, deactivating the contractor's Mirro account, confirming final invoice receipt with Finance, and returning any equipment. Because contractor end dates are not always fixed in advance, manual triggering gives the relevant person full control over timing.
9. Health & Safety Induction
Journey: Health & Safety
Who uses it: New employee, Facilities, Health & Safety Officer
Trigger: Automatic — fires on hire date
Before a new employee can access certain areas or equipment, they need to complete mandatory health and safety training. A H&S induction workflow ensures this happens automatically from day one. The employee receives tasks to watch required training videos and confirm they have read the safety policy (with the documents attached directly to the tasks). The Health & Safety Officer receives a task to verify completion and sign off the induction. The Requires Manager Approval setting prevents the employee from self-certifying the sign-off step.
10. Quarterly Business Review Preparation
Journey: Business Rhythms
Who uses it: Team lead, team members, Finance
Trigger: Manual — triggered 3 weeks before each QBR
Four times a year, the team lead triggers a QBR preparation workflow for the whole team. Each team member receives a task to update their section of the QBR deck with current metrics and commentary. Finance receives a task to provide the latest budget vs actuals. The team lead receives a task to consolidate the full deck and circulate it for review 48 hours before the meeting. Tasks have staggered deadlines (relative to trigger) to ensure contributions arrive in the right order.
A note on what Workflows module is not
Workflows is designed for structured, multi-person, deadline-driven processes. It is not a project management tool, a ticketing system, or a communication platform. Think of it as the engine that makes sure the right thing gets done by the right person at the right time — and that there is always a clear record of what happened.
For real-time collaboration, task discussion, or unstructured to-do management, the comment functionality within individual tasks can carry some of this weight — but the module's primary strength is structure, accountability, and visibility at scale.