![mirro_logo_pnk_slogan.png]](https://help.mirro.io/hs-fs/hubfs/mirro_logo_pnk_slogan.png?height=40&name=mirro_logo_pnk_slogan.png)
Imagine knowing what your company objectives are at all times. We made this possible with Mirro. Now, you can see every goal and key result. All transparent, organized by departments, teams, or people.
You can also align your colleague's efforts to company goals and boost both personal and group results.
When the visibility of an OKR is set to protected, the rest of the team will not be able to align to the same purpose. That being said, keep in mind to choose this option only when you would like the objective to be visible to you, and/or the person who is contributing to the OKR.
1. Adding a new objective
Based on the roles that you have in Mirro, different objectives can be added:
- A basic user can add individual objectives;
- A team leader can add individual objectives and team objectives;
- A department's coordinator can add department, team and individual objectives;
- A user with the access right - OKRs manager - can add and edit objectives at all levels, including organization objectives;
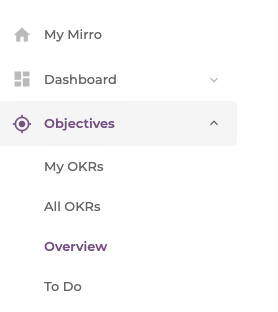
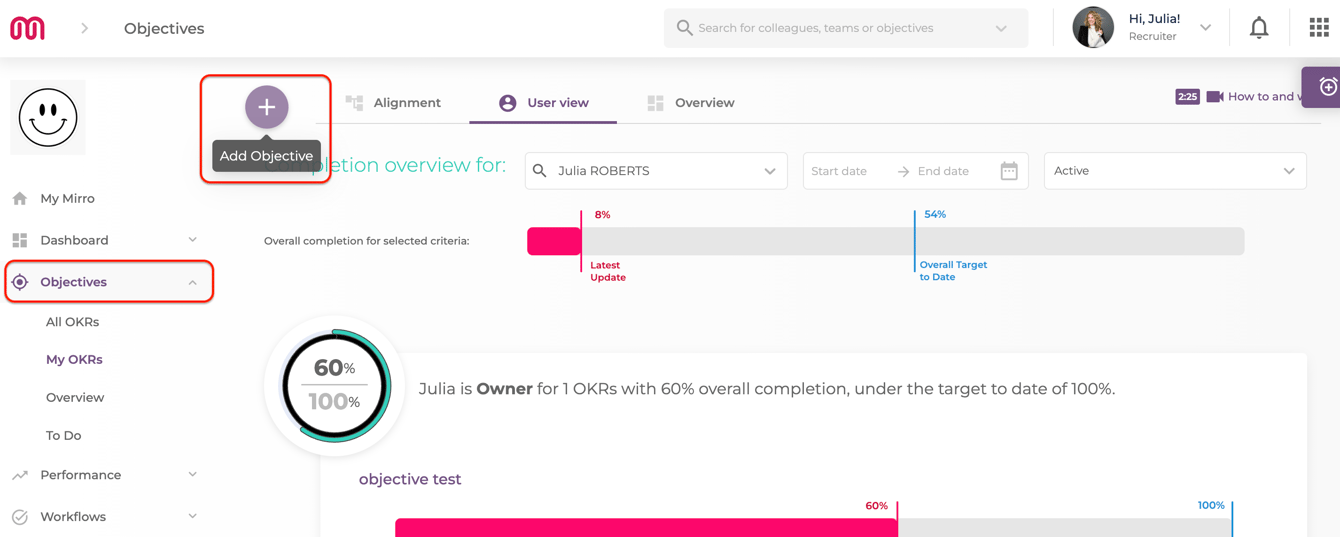
To add an objective, you will need to access the Objectives module and access the option Add objective, available in any section of the module.
A new form will be opened for you and you will need to fill in the details of the objective that you would like to add.
Imagine you would like to add a company objective to ensure an efficient level of high communication within the company. In this regard you will need to fill in the fields accordingly:
- Title: A short concise title to state the objective;
- Description: A short description of the objective;
- Type: Objective’s type, which can be individual, team, department or company;
- Owner: The person who owns the objective. By default your user will be assigned, but you can change it;
- Deadline: The deadline of the objective, the moment when you consider you will reach your goal;
- Visibility: Use public OKRs at the company level to keep things clear and assist people in demonstrating their impact;
If you would like to add a private objective, read our article: How to create a private objective.
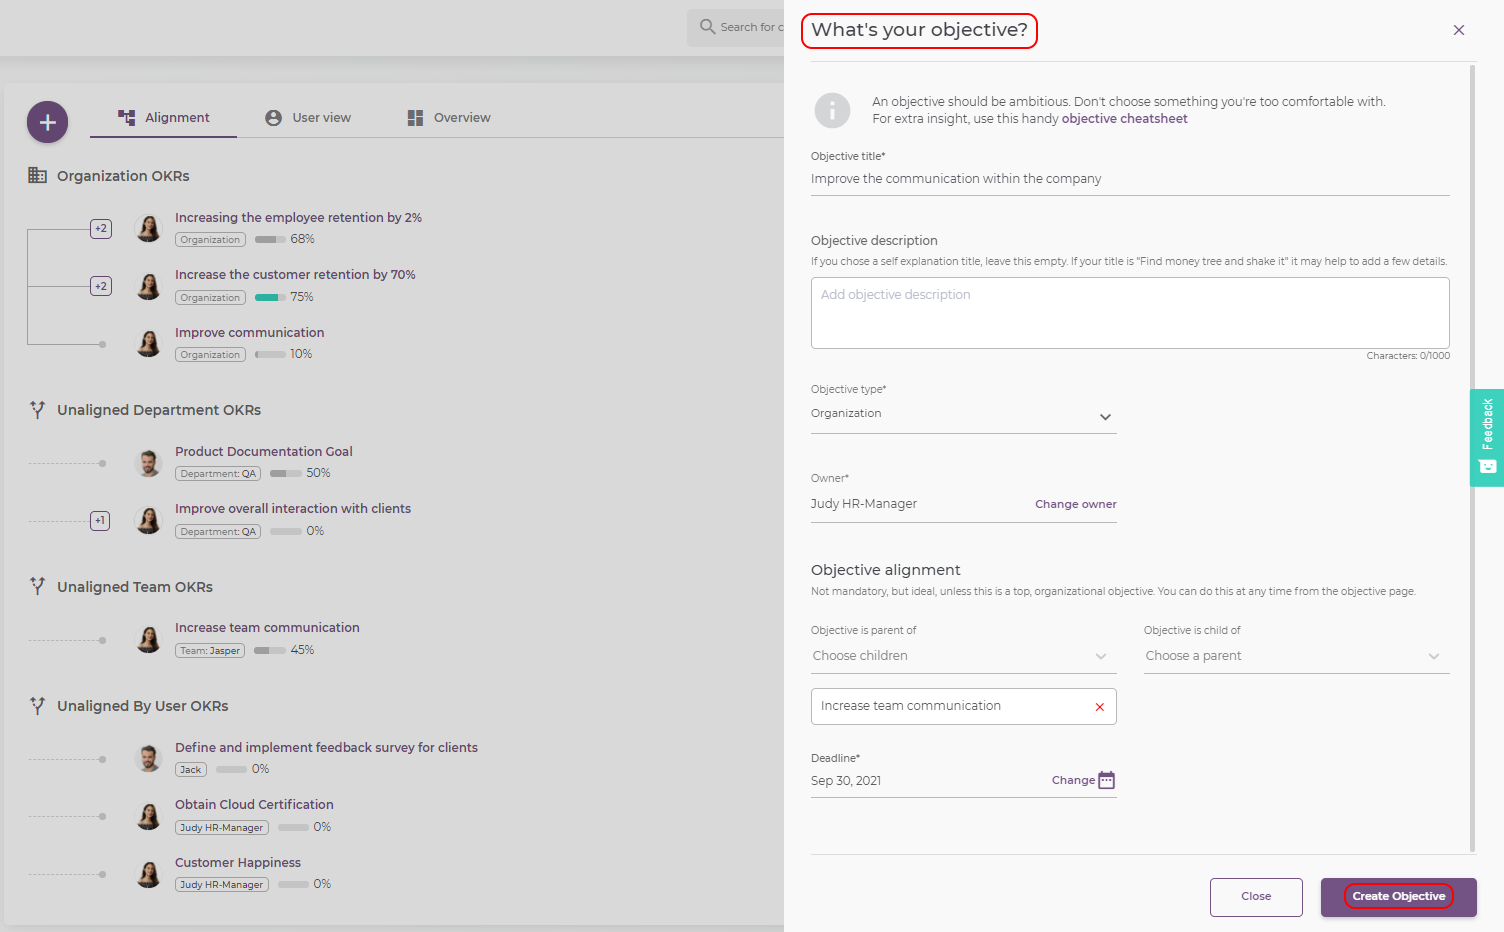
When defining the objective you will be able to define the objective alignment as well, to make sure that your work has a direct impact. For example, the organizational objective can be a parent for a smaller one, a team objective.
After filling in the fields, you will have the possibility to save the information, and the objective will be listed in the proper category. This objective will be listed in the Alignment section.
2.0. Defining additional details of an objective:
After saving the changes, you will be brought to the details of the objective to finish the process. In this section, you have the possibility to:
The option Target to date will show you, based on the start and end date of the objective, where the completion rate should be at that moment. This represents an estimation, so it lets you know where the progress should be at this moment to complete the objective.
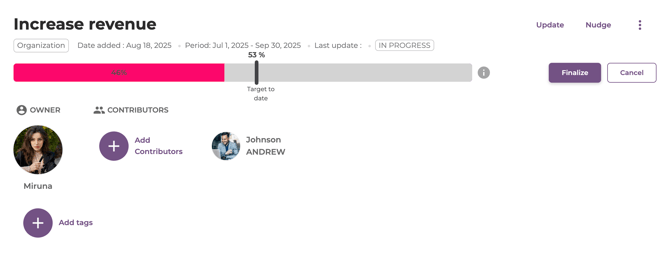
A contributor will be able to perform any updates for the key results. Only the owner of the objective will have the right to make any changes to the objective itself.
2.3. Add a key result to the objective created:
An objective can have from 2 to 5 key results which will help you to reach your goal.
Key results should focus on the outcome while being measurable with a concrete time schedule.
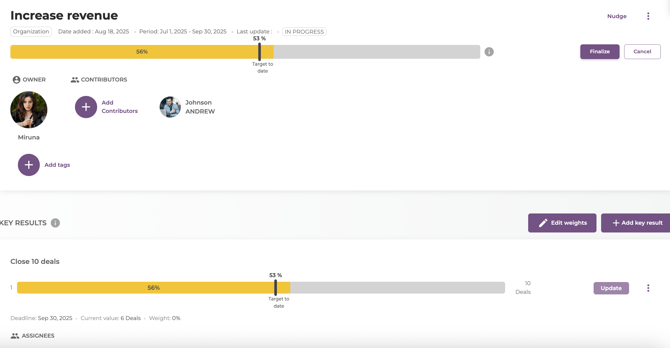
Set accurate expectations - define better Key Results using custom measurement units and values, as well as automated Objective score updates, by filling in the following information:
- Title: A short concise title to state the key result;
- Description: A short description of the key result;
- Deadline: The deadline of the key result, the moment when you consider you will finish your key result;
- Unit: The measurement unit of your key result. You have the freedom to choose any measurement unit that you consider suitable for your key result. You just need to type in the measurement unit and you are good to go;
- Start value and end value: The values that will help you to measure better your key result. The values will be used to calculate the score of the key result;
- Add an assignee for any key result: If you want, you can add an assignee for any key result to make sure that this specific KR has its own owner;
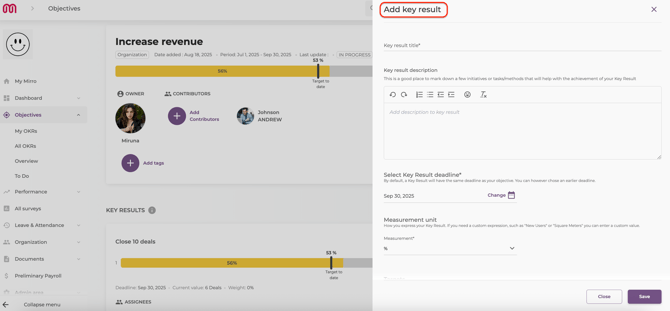
After filling in the details of the key result, you will need to save the changes to be reflected in the application.
When the key result will be saved, it will be listed in the details of the objective. Once a key result has been added to the objective, the progress of the objective can be completed only through the key result.
How to log rich updates on your Key Results
Tracking progress on a Key Result is more meaningful when you can show your work, not just move a number. Mirro now gives you a full editor when logging a Key Result update, so you can add context, attach evidence, and build a detailed record of how progress was actually achieved, directly on each update entry.
Where to find it
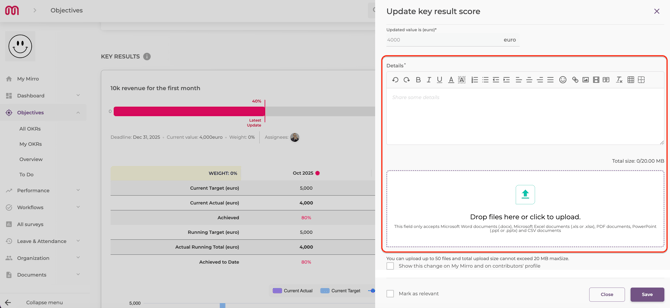
You will have to access the module Objectives, open any option, and click on the Key Result you want to update. Select Update to open the update editor:
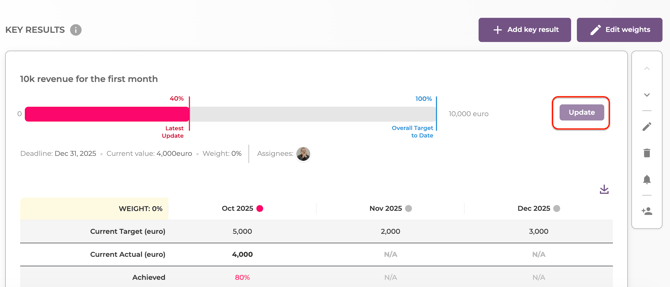
What you can add to an update
For each update you can include:
-
Current value: You will be able to add the current value of the progress. Between the brackets it is listed the value proposed for the key result
- Comment (mandatory): You can make additional observations regarding the progress of the key result – by congratulating your colleagues on the achievement.
- Show this change on My Mirro and on contributor's profile: You have the possibility to select if this progress will be posted on the feed to be seen by the user, no matter the role of the user.
- Formatted text: headings, bold, italic, bullet points, and numbered lists to structure your update clearly
- Links: paste any URL to reference an external document, dashboard, or resource
- Tables: organise data or comparisons directly inside the update
- Images: upload visuals, charts, or screenshots to illustrate your progress
- File attachments: attach documents, reports, or any supporting files relevant to this update
On mobile, you can upload images directly from your camera roll when adding an update or comment.
How updates are stored
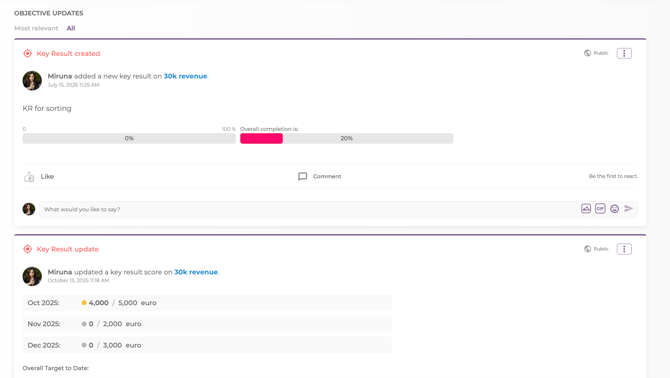
Every update you log appears as a card on the Key Result, in chronological order, on the bottom of the page. The Key Result itself stays clean, showing only the current progress value and status. This means you always have a traceable record of what was achieved and when, without cluttering the Key Result view.
💡 Tip: Use the Edit to document not just what the number is, but why it moved — or why it didn't. An update that says "Q2 pipeline at 78% — three deals slipped to Q3 due to procurement delays, evidence attached" is far more useful during a review conversation than a number alone.
Q: Does the content I add to an update affect the Key Result's progress value?
A: No. The progress value is updated separately using the value field when logging an update. The rich content — files, images, tables, text — is attached to the update card as supporting evidence and does not affect the progress calculation.
Q: Can I edit or delete an update after posting it?
A: No, an update can't be deleted after it was posted.
2.4. Manage key results inside an objective
Mirro lets you manage individual key results directly from an objective, so you can keep progress visible and organize key results based on what matters most.
Nudge key result assignees:
You can send a nudge for an individual key result, not just for the objective. To do this, the key result must have a user assigned. After an assignee is added, the Nudge button becomes available for that key result:
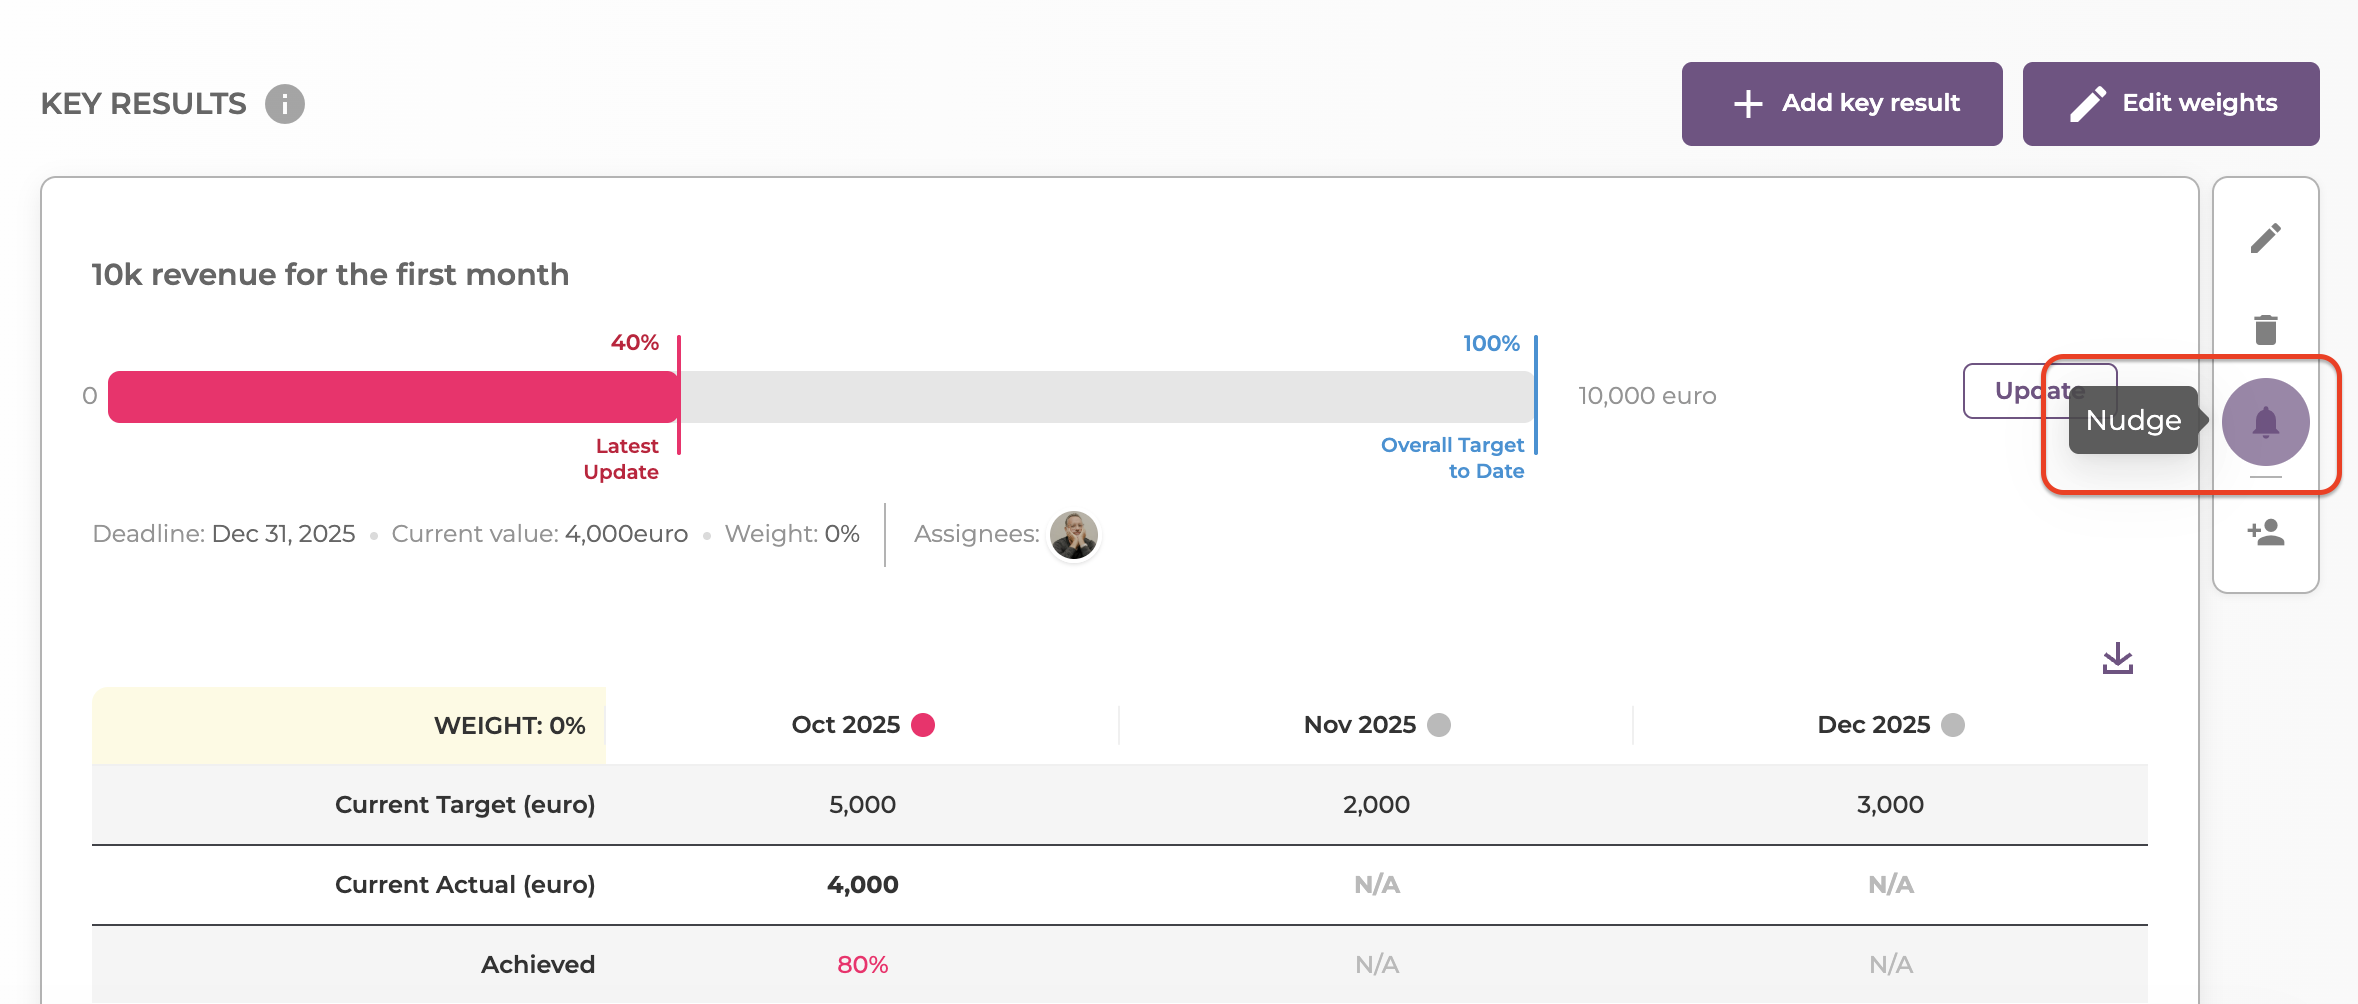
When a nudge is sent for a key result, the notification is delivered only to the assignees of that key result. Mirro uses the same notification flow as for objective nudges, with the message adjusted to refer to the key result instead of the objective.
Users who can send a nudge for a key result include:
- the objective owner;
- the performance manager;
- the head of department;
- the head of head of department;
- the OKRs manager;
2.5. Reorder key results inside an objective
You can reorder key results within an objective using the action bar on the right side of each key result. The up and down arrows let you move a key result higher or lower in the list, so the order reflects the importance set by your team or customer.
The same action bar also includes other key result actions, such as editing, deleting, and assigning users: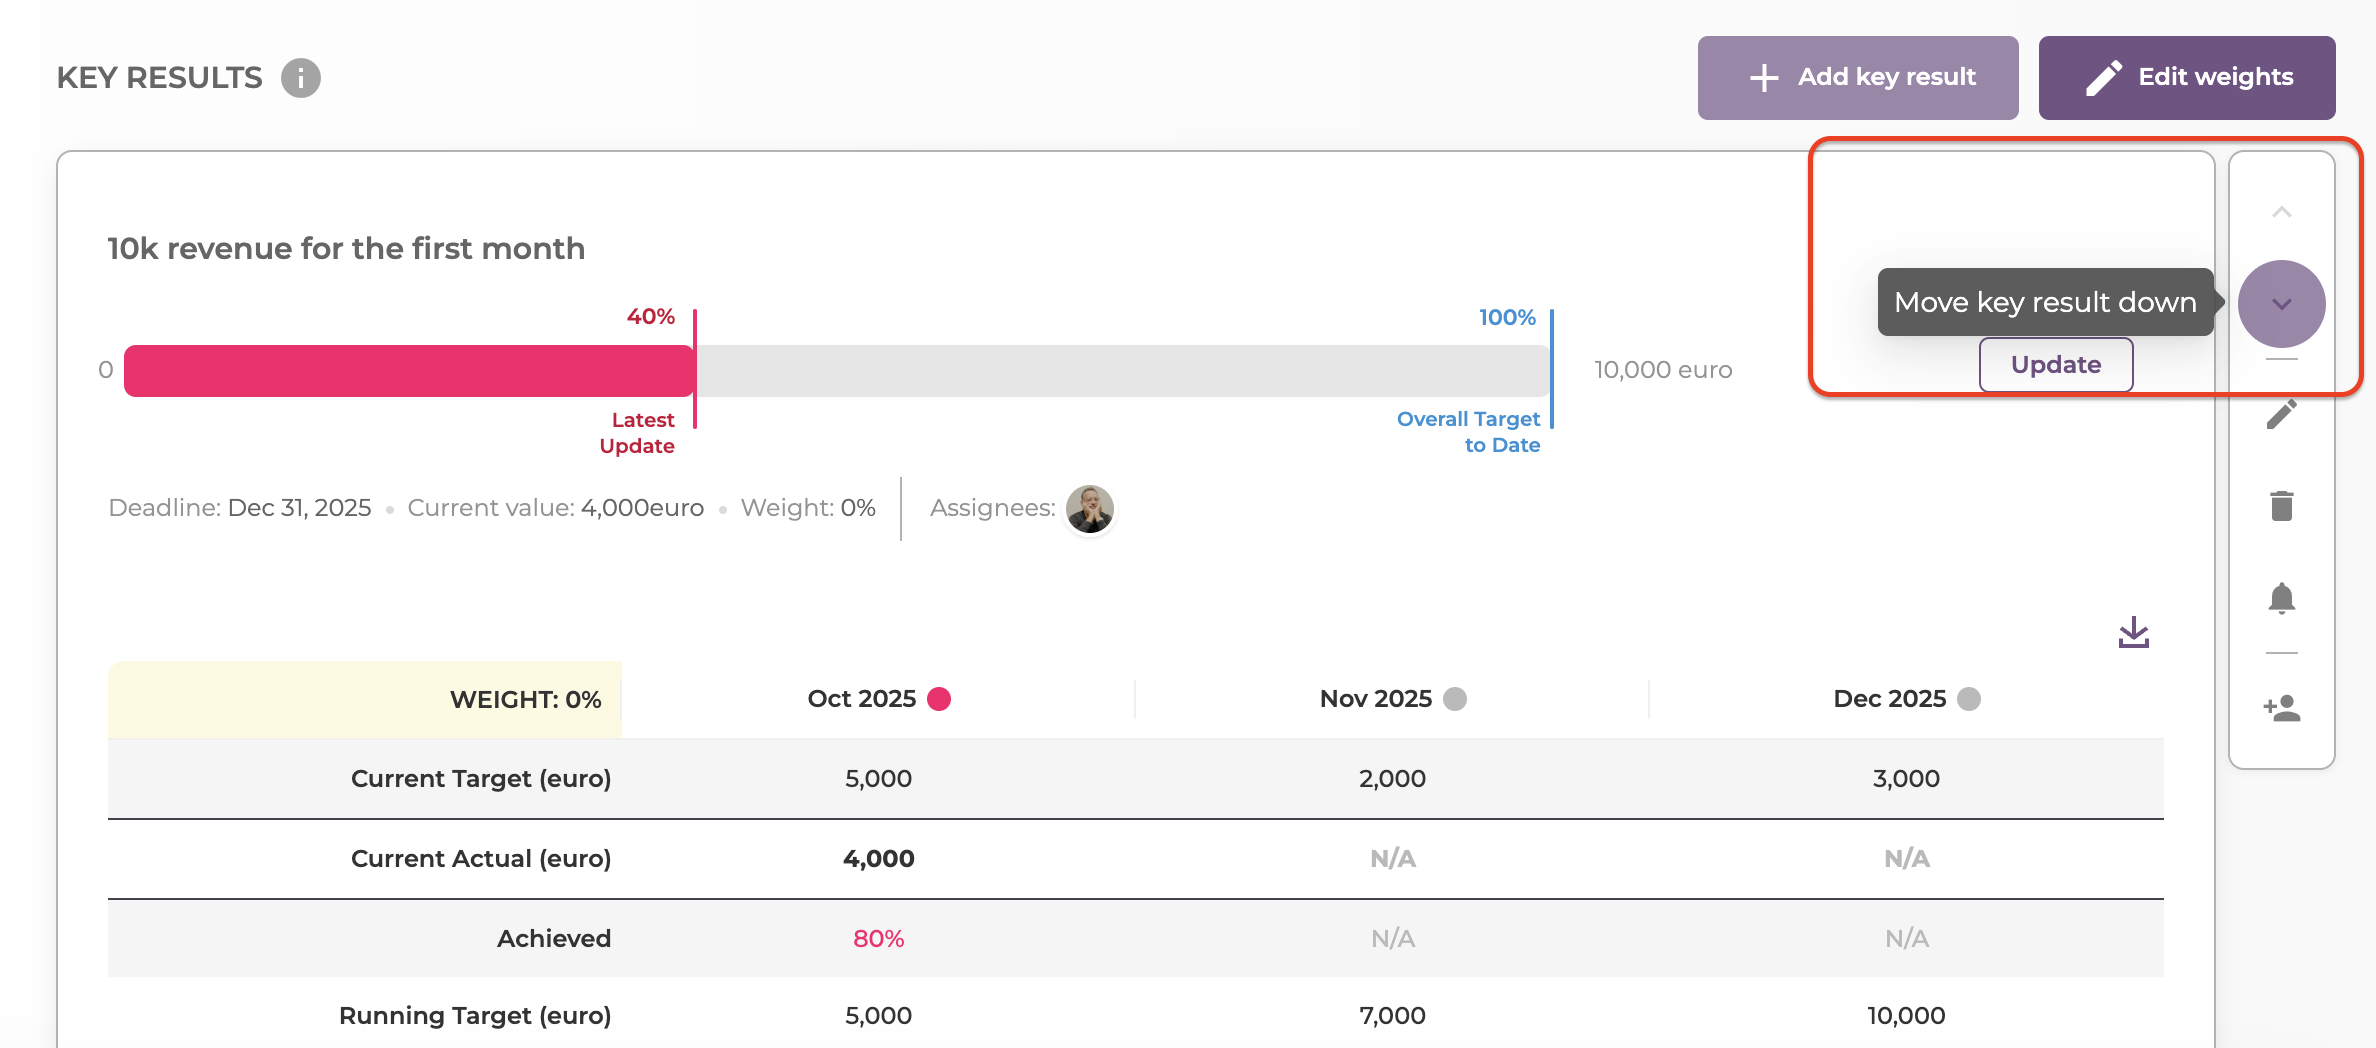
2.6. Adding weighted key results:
Some might want to attach different documents to an OKR, like .xlsx reports that prove the value of certain KRs.
By default, all KRs from an Objective have the same “weight”, meaning that the overall Objective score is the Mean Average of individual KR scores, in %.
For example, an objective that has 4 KRs, each KR has a (100/4) = 25% weight for the overall completion. By adding weight per individual KR, means that you can alter individual weight of any KR, with the only constraint being that the sum of the weights is 100%. The calculation for the overall completion of the Objective will be a weighted average of KRs completion, according to their respective weights.
This action is available for the Objective Owner / HOF / TL / Objectives Manager (similar logic to adding specific OKRs of different types), as well as Contributors.
What are the steps?
1. add an objective manually;
2. add a normal key result to the objective; after that, you will see the option edit weights to that key result: a modal will pop up, depicting all of the KRs and an input field to their right. This input field sets the percentage of weight (0-100) for each KR.
An indicator of the total sum of percentages will be displayed, helping users easily input the desired amounts;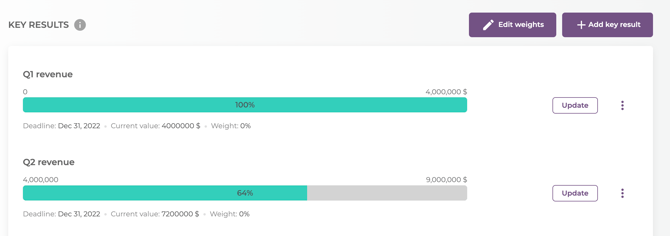
3. validate total score of 100 for KR weights;
When adding extra Key Results after changing weights:
If you set specific weights for the KRs added and add a new KR, you will be prompted that the current KR weight will be set to “0”, and you need to adjust the weights accordingly;
When importing OKRs:
The import of OKRs will include another setting for each key result, a column called weight. It accepts values between 0 - 100, representing weights of specific key results, available for the actions of adding, updating or deleting key results. Blank field in import (which is the default value for unweighted KRs) will translate into mean average calculation, as it’s already in place. Leave blank for equal weights calculation for this OKR will be indicated in the column title.
You can find more information in our article: How to import OKRs.
When attaching a file to an OKR:
An OKR owner or a contributor, can, at all times attach different documents to an objective. The action will be done via an upload modal (multi-upload possible). The attached documents will be visible as tags in the OKR header section-preview, remove and download actions available.
2.5 Adding multiple targets per key result:
Multiple Targets per Key Result will lighten up your OKRs structure while maintaining control over expected results.
You will be able to split each Key Result into different Targets (e.g. monthly targets, or specific project milestones) that add up or separately contribute to the overall achievement of the Key Result.
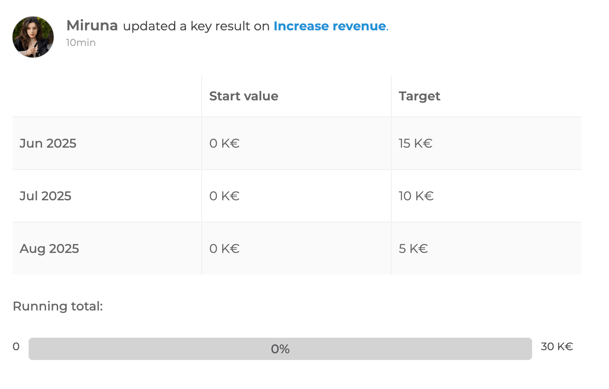
Let's take an example: we created a key result with an overall target of 30k euro, from June 1st to August 31st; To separate this big target into smaller ones, I've divided the total sum for these three months, as you can see:
After that, every time I update one of these targets, the key result will be updated accordingly:
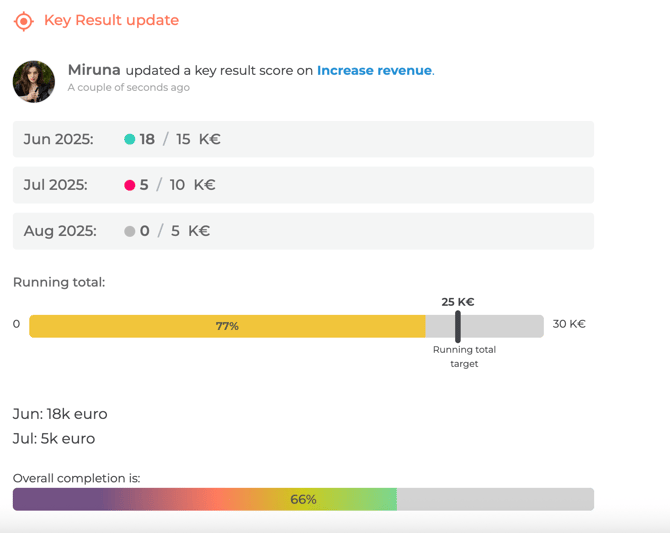
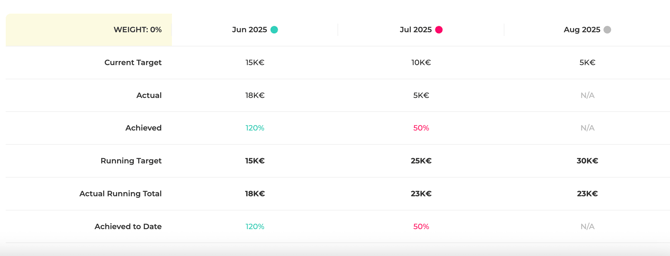
The colours are here to help you read the table better:
- pink- not quite on target yet, you can do better;
- yellow- getting there;
- green- exactly where you need to be;

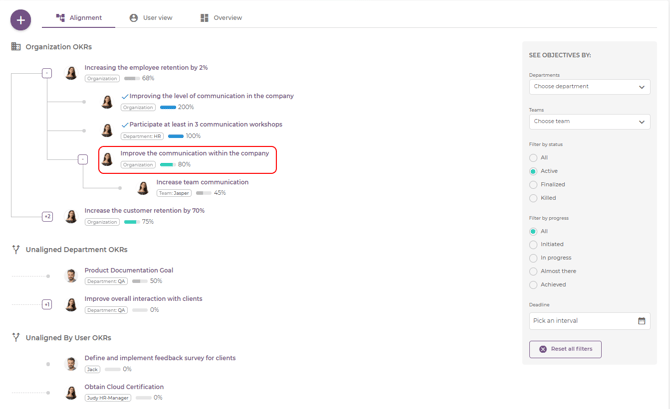
While being in the alignment chart, you can also access the Expand option to see the details of the other objectives that are linked with your current objective. For example, the objective of increasing employee retention by 2%, can be expanded because it is included in another alignment as well.
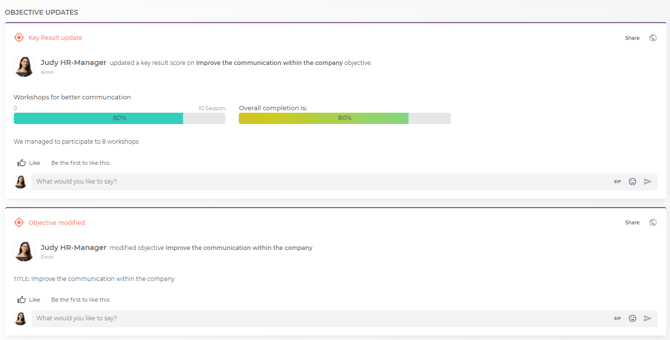
Specific updates history to share with everyone - never skip a beat about what happened with an OKR. How each update impacted the overall result, how you guys worked together, and all history in the objective updates section.