Mirro makes the set-up process easier by using imports. You can import multiple information in your application:
- Users and their details
- Management lines
- Employment Contracts
- Performance managers and coordinators
- Time off balances
- Carry over days
Import files support .xlsx format and import templates are available to download. For a successful import, please mind data formatting from the downloaded templates.
To import the data in Mirro, you will need to access the Admin area module > Import data section. After deciding which details would you like to upload, you will need to download the template which should be filled in with the information according to the header and the legend (available in the second excel tab).
Import multiple contracts at once
- The columns marked with purple are mandatory
- Please note that users will be matched by their EmployeeIdentifier or email (column A). You need to have the users in the application (you can use import users)
- Please use this date format: yyyy-mm-dd (format all columns that contain dates before uploading the file)
- Please make sure Contract Status (column D) contains only the following values: "active", "suspended", "terminated"
- Cause for suspension/termination (columns E, F) should contain codes detailed in the sheet CauseForSuspention/Termination
- Please make sure Contract Type (column J) contains only the following values: "INDEFINITE_TERM", "FIXED_TERM", "ZERO_HOUR" and "APPRENTICESHIP"
- For terminated contracts, please complete both Contract Termination Date (column L) and Last Worked Day (column M)
- Please use the Company Location code for the employee's main location (column W)
- OccupationalClassificationCode (column X) is the numerical code of the position, according to your country - ESCO (European Union), ISCO (International), SOC (UK), NOC (Canada), COR (Romania) etc
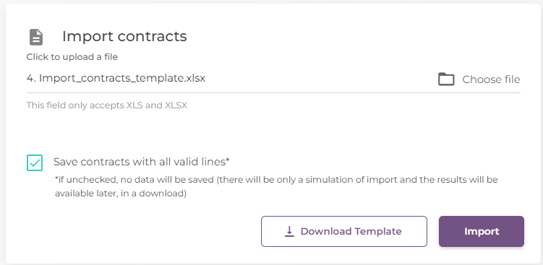
To make sure that all details are filled in accordingly, you will have the possibility first to simulate the import. When you perform a simulation, the application will let you know if the information from the file is correct or not. The difference between the simulation process the and import process consists of the option: Save contracts with all valid lines* which should be unselected when performing a simulation.
After the simulation has been finished, you will be redirected to the Import History page where you will be able to download the file imported to see the errors, if any of them occur. At the same time, when the process is finished, you will be notified offering you the possibility to download the file directly from the notification. The errors will be highlighted in the downloaded file with red and comments will be available with the error messages.
Once you access the import option, you will be redirected to the Import History section where you can track the progress of the import. At the same time, when the process is finished, you will receive a notification that will let you know that everything is all right.
When the details are imported, you will be able to find each contract available for each person in part, by accessing the User profile- Employment Data option and the Contract tab.
What if I want to add multiple contracts for an employee?
Adding multiple contracts for an employee is now possible, and it's even easier than you've ever imagined!
Simply access the module Admin Area- Import data, go to the section Import contracts and download the template. After that, you will have to complete it just like you normally would, but now you'll have to add all the contracts for your user.
Good to know:
1. You can add a contract for each legal entity that you have; you can do that by accessing the module Admin area- Company settings, and scroll down until the option Contract legal entity enablement, where you will have to click on Yes:
Another section will show up, where you will be able to add your legal entities. After that, when adding the contracts through import or manually, you will have to add the legal entity to each contract in part.
2. If the user doesn't have the overwrite last worked day setting checked, then we will update this field when all active contracts are terminated, using the most recent date.
3. If the user doesn't have the overwrite hire date option checked, then we will update this field using the oldest active or suspended contract.
4. When exporting the payroll and timekeeping, we will add separate entries for each contract in part.
You can see the whole process more detailed in our video How to import contract details.