Each form can have its own set of questions, timeline, and participants, allowing you to tailor the evaluation process to your organizational needs. This approach ensures that feedback is structured, relevant, and actionable for every type of session you want to run.
Key points:
-
Multiple forms can coexist in the same time.
-
Administrators can customize questions, participants, and timelines per form.
- Managers and mentees an have several forms assigned
Creating a custom form has never been easier, especially when the impact matters so much!
To create a new check-in form, you first need to create the questions in the Questions Library. You can find the steps in our dedicated article here.
After you’ve successfully added the questions, it’s time to put them all together! To do this, access the Performance – Check-in Sessions module.
By clicking on Create a New Check-in Session, you will see two options: Schedule & Audience and Check-in Form Builder.

Now let's schedule the audience and the type of session:

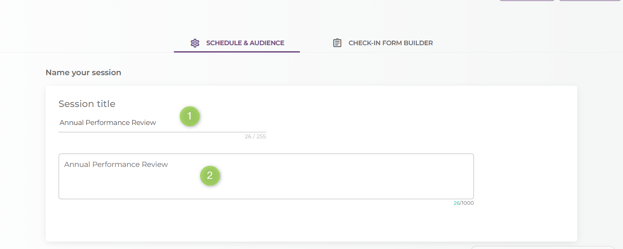
1. First, we should name and describe our session, depending on its scope — 1:1, check-ins interviews, or performance review:
2. Then, decide whether our session will be Fixed or Ongoing:
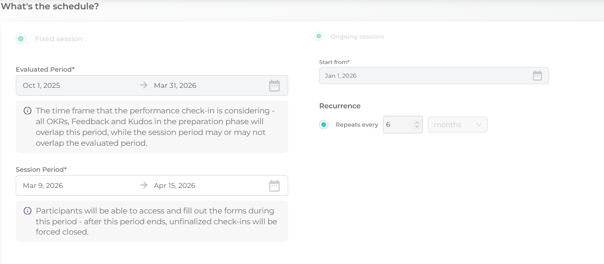
In a Fixed session, you can set a session period and an evaluated period
Understanding the Session Period vs. Evaluated Period
In Mirro, there are two important concepts within an evaluation session: Evaluated Period and Session Period. These have different roles and it is important to understand the distinction between them.
Evaluated Period represents the time frame that is being evaluated. For example, if the evaluation period is January 1 – December 31, 2025, then the evaluation refers to the performance during this interval.
The evaluation period ensures that even if the evaluation happens in April, only performance data from the relevant period (Jan -Dec) is included.
* Data refers to objectives, feedbacks and kudos for the specified period.
Session Period represents the time frame during which users can complete the evaluations. In other words, it is the period when the session is active and responses can be submitted.
For example:
• Evaluated Period: January 1 – December 31, 2025
• Session Period: January 1, 2026 – January 15, 2026
In this case, the evaluation of the performance is from 2025, but they will only be able to complete the evaluations between January 1 and January 15, 2026.
In an Ongoing session, the process repeats at regular intervals, for example, every 3 months, starting from the selected start date.
For example, if the start date of your session is January 1st, the duration of the first session will be January–March, and the next session will start in March and end in June.
3. Now it’s time to establish the audience for your session and set up who will participate.
Managing Users and Audience in Active Evaluation Sessions
Once a session starts, evaluations are automatically generated for all users included in the audience. To add users, you need to create additional conditions and then use Sync Audience. The new user will be included in the current session, and an evaluation form will be generated for them automatically.
You can also remove users from an ongoing session. When removing a user, keep in mind that it is important to first delete the user and not use the Sync Audience option yet - Only after the new user is added you can use the Sync audience option. If you use it before and then save the changes, evaluations will be generated for all other colleagues( in case no one is left in the audience)
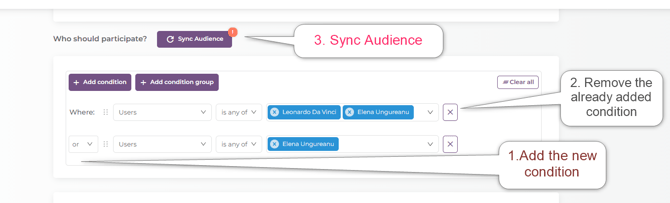
If you need to replace a user, add the new user first, remove the old one, then sync and save. This ensures evaluations are only generated for the intended person.
You can add a condition or a condition group to configure the audience:

If you add a condition, the session can be addressed to specific:
-
users, departments, teams, work types (FTE or Collaborator), locations, job roles, or based on tenure or hire date.

Or, if you want a more configurable audience, you can add a condition group, which allows you to target, for example, only certain users from specific departments. Here’s a little secret: when it comes to this combination, the sky’s the limit — so enjoy it! 🤩

The next and final step is to build our custom form. There are a lot of goodies here, so let’s explore them.
-
We need to set up the sections of the form and give each a title and description based on its purpose.
For example, Section 1 can be dedicated to general questions, while Section 2 can be reserved for the areas we want to improve.

🤔 But I have a global organization and we are multilingual. No worries, we've got you covered 😊. Once you’ve added the Sections’ titles and descriptions, just click on the Translate button and select the source language and the target language for the translation.
Note: This will only translate the Section Title and Section Description — the questions will remain in the language initially defined.

2. Then we add our questions to the created Section - by clicking, of course, the Add Question Button - here we will have access to the question library created.


After clicking on the question, you will have access to a range of settings, which we will explore next:

Respondents:
The question can be addressed only to the mentee, only to the manager, or to both.
If we choose to address the question only to the manager, we can also enable the Manager Private Response, which means that the answer will be hidden from the mentee.
Question is:
Required – Respondent must answer this question ( mandatory)
Allow further discussion – Enables a comment field for additional context
Ask for more details – Prompts user to elaborate on their answer
Display Options
Show in Performance Insights – The answers will be visible in the Performance dashboard
Show in Employee History – Display answers in employee history → it refers to the My Check-in section


WoooW 👁️👁️ – Looks AMAZING! 🤓
Let’s continue⏭️. The next step is to build the Finalize or Summary section of the form, which is configured using the same process described above for the other sections:

After defining the Finalize section, the only remaining step (I promise ✌🏻) is to publish your perfectly crafted form by clicking the Publish button:

Here, we need to set the dates of the evaluation — more precisely, the Session Start and End Date, the Evaluation Period, and then hit Publish 🎉.
What Happens When an Evaluation Session Reaches Its End
The platform automatically checks all evaluation sessions with the In Progress and Not Started status on a daily basis.
If a session’s end date is earlier than the current date, the system will automatically:
-
Mark the session as Finalized.
-
Close all check-ins in that session with status Not Started or In Progress, setting their status to Finalized.
-
Set the finalize date for these check-ins to the current date (the date when the system performs the check).
This process ensures that sessions that have passed their scheduled period are closed automatically.
Finalizing an Active Evaluation Session as an Admin
An active session with status In Progress can be also finalized manually.
When a session is finalized:
-
All evaluations with status In Progress or Not Started will appear in the Check-in Report with the status Finalized → Force Closed.

I said that was the last step — well, yes… but actually no 😄. We also need to make sure we can always filter all the forms created based on their status, the type of session, or by searching by name.

Ok - that's all ! Have wonderful check-in sessions!![]()
FAQ - there isn’t a single article without this section, right? And on top of that, it’s super useful.
-
What happens to an ongoing evaluation if an employee’s manager changes?
Only in a fixed session, if an employee is assigned a new manager, the system automatically detects the change and opens a new evaluation (check-in) for the new manager.
Note on Timing: Please keep in mind that this update is not instantaneous. While the system's synchronization process runs daily ( AT 07:00 AM and 14:00 PM GMT+2), it may take approximately 30 to 45 minutes after the scheduled task for the new evaluation to appear in the manager's dashboard.
-
What happens if I want to edit a session?
Ah — pretty straightforward — go to Performance → Check-in Sessions and click on Edit.
Some fields are disabled and cannot be modified because the current session has been published.
You will still be able to edit the Session title and description, the schedule of tit and the audience
-
What if I want to change the audience?
Go to Performance → Check-in Sessions and click on Edit.Go to Who should participate → add the new condition → you will see a preview with the new members added, then click Sync Audience and Save – this is important.

-
What if I want to delete a session?
Go to Performance → Check-in Sessions and click on Delete.


-
-
You will not be able to delete a session that is in progress or finalized – only sessions that are scheduled (period has not started) or in draft can be deleted.
-
What happens if I delete a question?
Gone FOREVER 😨 — but no worries — you will not be able to delete questions that are being used or were used in current or previous sessions.